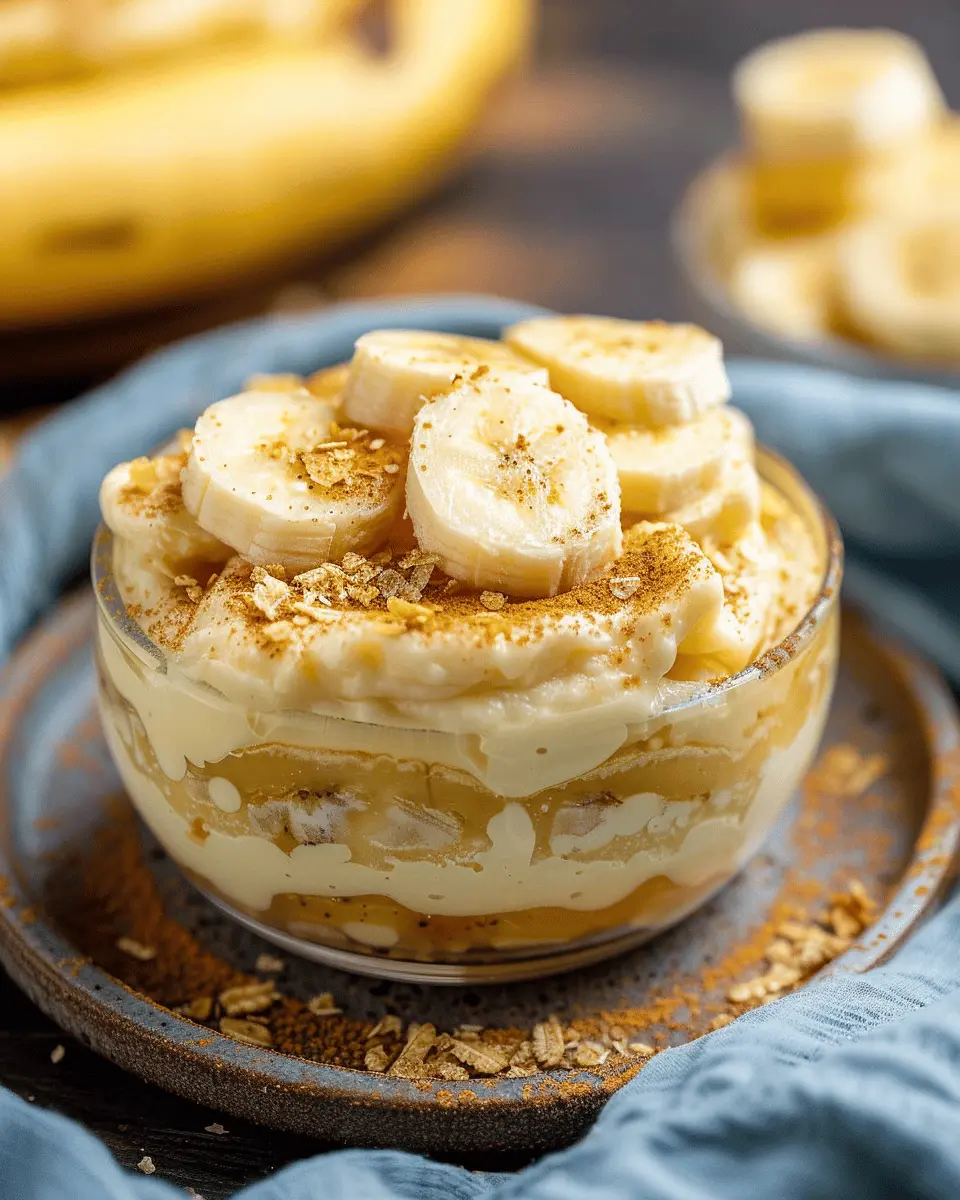
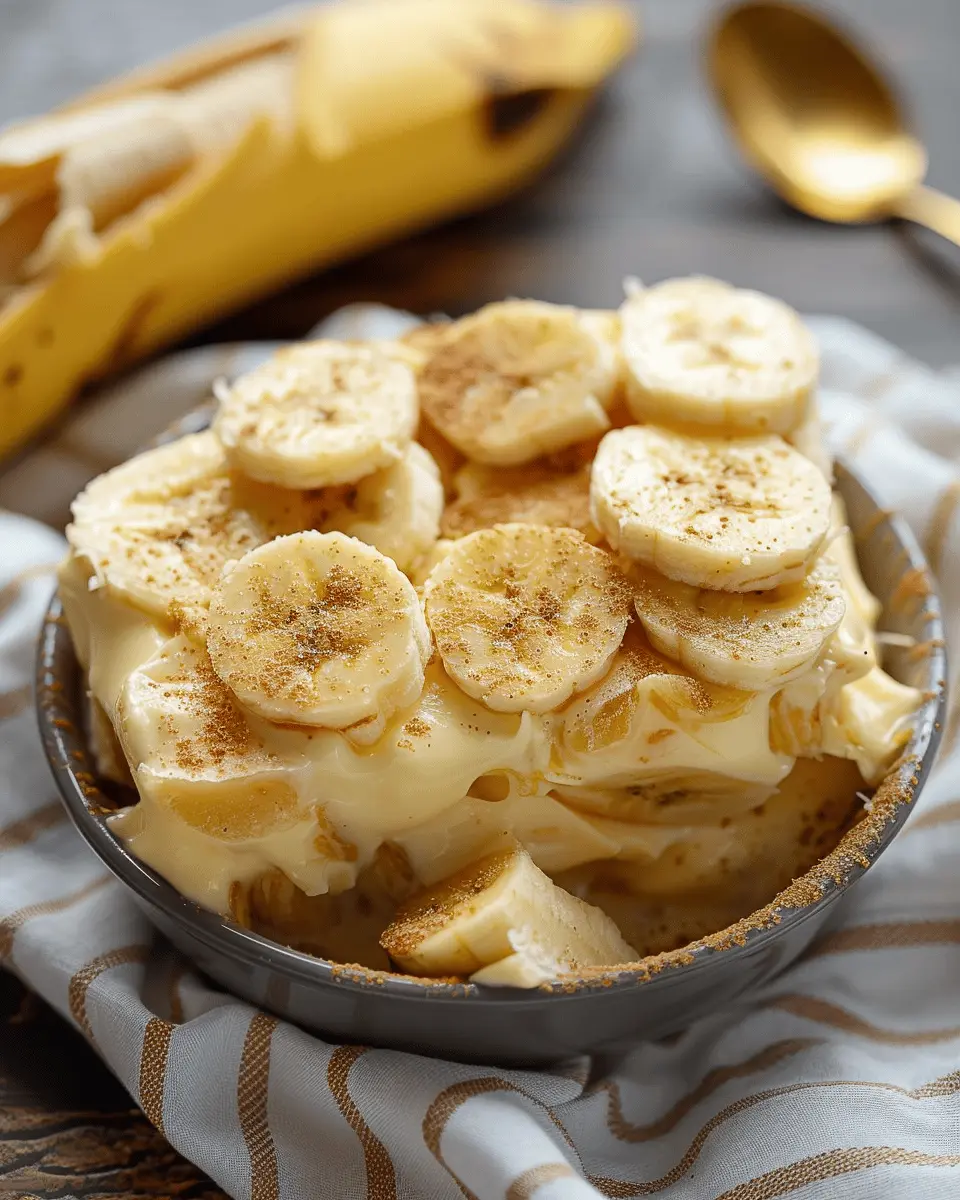
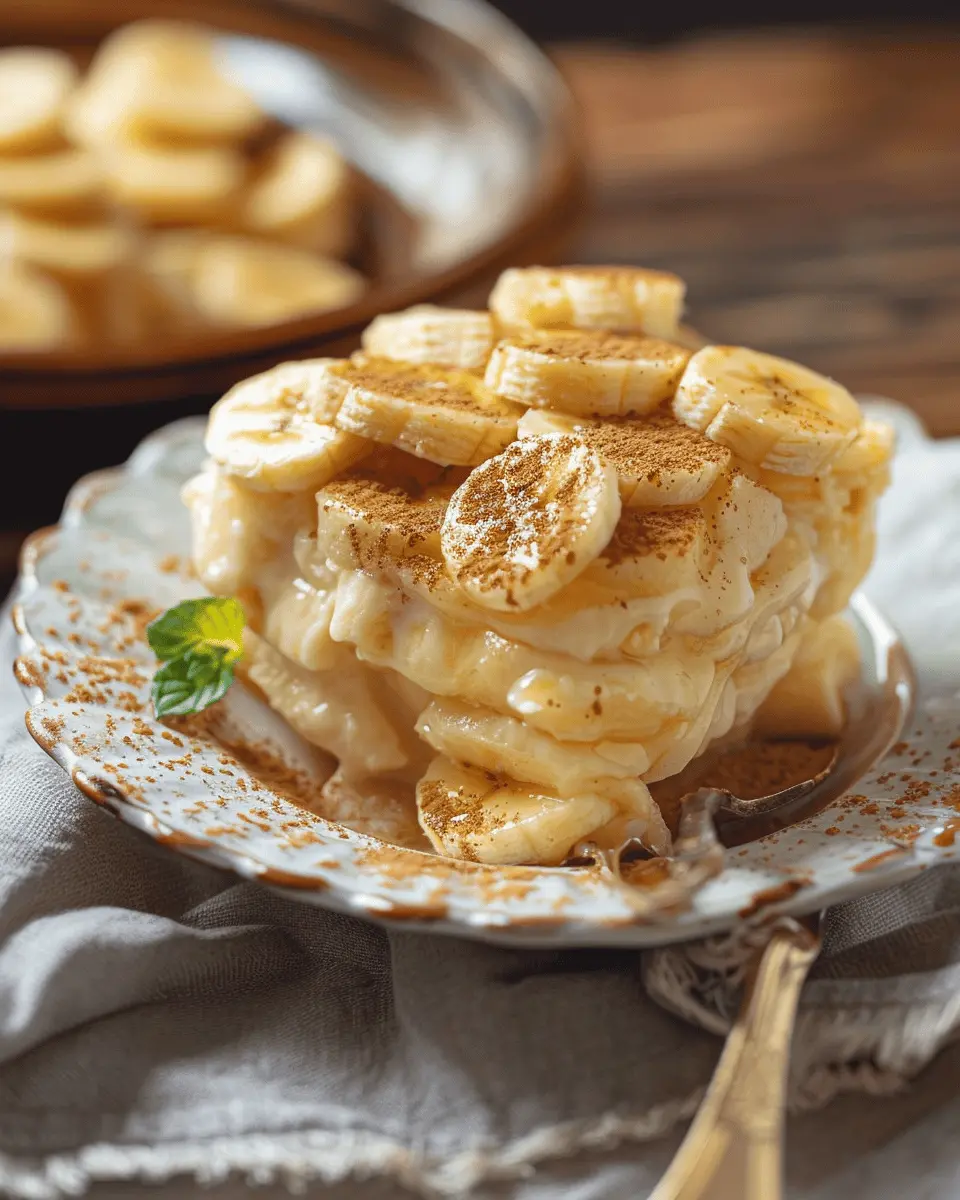
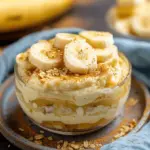
Introduction to Old-Fashioned Homemade Banana Pudding
Why Banana Pudding is a Culinary Classic
Banana pudding holds a special place in the hearts of many, evoking memories of family gatherings, potluck dinners, and delicious moments shared around the dinner table. This dessert is more than just a sweet treat; it’s a comforting reminder of simpler times. Its creamy texture, layered flavors, and fresh banana slices create the perfect harmony that’s hard to resist. One bite of this classic dessert can transport you back to your grandmother’s kitchen, where the air is filled with the scent of vanilla and freshly baked cookies.
Did you know that banana pudding has roots in the South, gaining popularity during the late 19th century? This makes it a great conversation starter, as it highlights our culinary history. You can dive deeper into the cultural importance of this dessert by visiting Southern Living’s take on banana pudding to explore different interpretations!
The Joy of Making Pudding from Scratch
There’s something incredibly satisfying about making Old-Fashioned Homemade Banana Pudding from scratch. While store-bought varieties may offer convenience, nothing compares to the rich, comforting flavors that come from your own kitchen. You’re not just mixing ingredients; you’re crafting a dish that will resonate with everyone who tastes it.
The process allows you to control the sweetness and texture, ensuring that your pudding reflects your personal taste. Plus, making pudding at home opens up possibilities for experimentation. Perhaps you want to swap in some flavored extracts or even add a layer of crushed cookies for that extra crunch. The options are truly endless!
Quick Overview of the Recipe
This recipe for Old-Fashioned Homemade Banana Pudding involves just a few simple steps:
- Make the custard: Combine egg yolks, sugar, milk, and vanilla until smooth.
- Layer it: In your serving dish, alternate layers of custard, sliced bananas, and vanilla wafers.
- Chill: Let it sit in the fridge so the flavors meld together beautifully.
In about an hour (plus chilling time), you’ll have a stunning dessert ready to serve. Each bite promises a delightful blend of creaminess and freshness, making it a hit for any occasion. Whether it’s a weekday dessert or a holiday feast, this Old-Fashioned Homemade Banana Pudding will always be in style!

Ingredients for Old-Fashioned Homemade Banana Pudding
Creating a delightful Old-Fashioned Homemade Banana Pudding starts with the right ingredients. Here’s a rundown of what you’ll need to whip up this comforting classic.
Essential Ingredients
- Ripe Bananas: About 3–4 medium-sized bananas for that sweet, creamy taste.
- Vanilla Wafers: A must for texture, adding a delightful crunch.
- Pudding Mix: You can use instant or cook-and-serve—both work splendidly.
- Milk: Whole milk is the star here, providing a rich base.
- Sugar: For a touch of sweetness—adjust according to your taste.
- Whipped Cream: Freshly whipped makes all the difference for that light, airy finish.
Ingredient Alternatives for Dietary Restrictions
If you’re looking for alternatives, consider using almond milk or coconut milk for a dairy-free option. You can also swap regular sugar for organic or even maple syrup for a unique twist. For a gluten-free version, look for gluten-free vanilla wafer options.
Tips for Choosing the Best Bananas
When picking bananas, look for ones that are mostly yellow with a few brown spots—these are perfectly ripe and will offer the sweetest flavor. Avoid overripe bananas with dark blemishes if you prefer a less mushy texture. For more tips on selecting fresh produce, check out this informative guide.
Armed with these ingredients and tips, you’re one step closer to enjoying a scoop of nostalgia in every bite! Happy pudding making!
Step-by-Step Preparation of Old-Fashioned Homemade Banana Pudding
There’s something truly delightful about Old-Fashioned Homemade Banana Pudding. It’s a dessert that warms the heart and brings that nostalgic smile to your face. The secret lies in the perfect combination of fresh bananas, creamy custard, and crunchy vanilla wafers. Let’s walk through the steps together and make a dessert that’s bound to impress!
Mix Dry Ingredients
Start by gathering your dry ingredients: granulated sugar, cornstarch, and a pinch of salt. In a medium-sized bowl, whisk these together until they’re well combined. This mixture forms the essential base for your pudding.
- Ingredients Needed:
- 3/4 cup granulated sugar
- 1/4 cup cornstarch
- 1/4 teaspoon salt
Why is it essential to mix these first? Well, by ensuring they’re evenly distributed, you prevent any lumps from forming later on. Plus, it’s the perfect warm-up for what’s to come!
Whisk in Milk
Next, it’s time to add the milk. Gradually whisk in about 3 cups of whole milk into your dry ingredients. This is where the magic begins! The creamy texture of whole milk will make your pudding rich and velvety.
- Pro Tip: If you want an extra layer of flavor, consider using vanilla-infused milk or adding a splash of vanilla extract!
Mix until all the dry ingredients are completely dissolved in the milk. This whisking process is crucial for creating that luscious consistency everyone loves in Old-Fashioned Homemade Banana Pudding.
Cook until Thickened
Now, pour the mixture into a saucepan over medium heat. You’ll want to continuously stir it as it warms up. The heat will activate the cornstarch, and soon, you’ll notice it thickening beautifully.
- Cooking Time: This will generally take about 8 to 10 minutes, but keep a close eye!
As the mixture thickens, you’ll be greeted with that comforting aroma of sweet milk and sugar—trust me, your anticipation will build as you watch the transformation.
Temper the Eggs
Once your mixture begins to bubble and thicken, it’s time to temper the eggs. In a small bowl, beat 3 large egg yolks separately (don’t throw away those whites!). Gradually pour a ladle of the hot mixture into the eggs while whisking vigorously.
This step is vital as it prevents the eggs from scrambling when added to the hot mixture. After tempering, pour the egg mixture back into the saucepan. Continue to cook for 2 more minutes until the pudding is nice and thick.
Layer with Vanilla Wafers and Bananas
Ah, this is where the fun really begins! Take your baking dish and layer it with vanilla wafers, followed by slices of ripe bananas. Pour a generous portion of the pudding over the layers. Repeat this process until you’ve used all your ingredients—making sure the last layer is pudding.
- Layering Tips:
- Use the freshest bananas you can find; overripe bananas can alter the flavor.
- Don’t be shy with the pudding; ensure each layer is covered well!
Chill Before Serving
Finally, cover your Old-Fashioned Homemade Banana Pudding with plastic wrap, pressing it directly onto the pudding to prevent a skin from forming. Refrigerate it for at least 4 hours, but overnight is even better if you can wait.
When it’s time to serve, consider topping it off with some freshly whipped cream or crushed vanilla wafers for a delightful crunch on top.
This step-by-step guide will help you create a dish that’s not just dessert but a cherished memory. Enjoy every delightful spoonful of your homemade banana pudding, and watch as it brings folks together—just like it did back in the day! If you’re looking for more sweet treats, check out Serious Eats for inspiration.
Variations on Old-Fashioned Homemade Banana Pudding
Gluten-Free Banana Pudding
Enjoying Old-Fashioned Homemade Banana Pudding doesn’t have to mean sacrificing your dietary needs. For a gluten-free twist, simply swap out regular flour for a gluten-free blend. Many blends can be found in local grocery stores that work just as well in the pudding base. You can also ensure that all your ingredients, especially vanilla wafers, are certified gluten-free. Serve it in a dish that can highlight those lovely layers, and you’re in for a treat!
Chocolate Banana Pudding
Craving something a little richer? Enter Chocolate Banana Pudding. To transform your classic recipe, add cocoa powder to the pudding mixture. This not only enhances the flavor but gives it an indulgent vibe that chocolate lovers crave. For extra flair, consider layering in chocolate pudding alongside your traditional banana pudding. It’s a fun surprise that visually elevates your dessert while tantalizing your taste buds. Why not garnish with some chocolate shavings on top for that perfect finish?
Banana Pudding Parfaits
Those looking for a quick and stylish presentation will love Banana Pudding Parfaits. These individual servings are perfect for gatherings or just a cozy night in. Simply layer your homemade pudding with sliced bananas and crushed cookies in a clear glass. You’ll not only treat your guests to delightful flavors but also create an eye-catching display. Plus, the personal touch each person gets makes it feel extra special. Mix things up with layers of whipped cream for added texture!
These delightful variations on Old-Fashioned Homemade Banana Pudding showcase just how versatile this classic dessert can be. So, which one will you try first?
Cooking Tips and Notes for Old-Fashioned Homemade Banana Pudding
Essential Tools and Equipment
To make your Old-Fashioned Homemade Banana Pudding, you’ll need a few key tools. A heavy-bottomed saucepan is essential for even heating when making your pudding base. A whisk is crucial for mixing, while a mixing bowl and a rubber spatula help with folding in the whipped cream. Don’t forget a large serving dish to showcase your delicious creation!
Common Mistakes to Avoid
Everyone loves a classic banana pudding, but a few common missteps can ruin the experience. Avoid overcooking your pudding—aim for a creamy texture, not scrambled eggs. Also, choose perfectly ripe bananas; they should be yellow with just a few speckles, ensuring they are sweet but not overly mushy. Lastly, resist the urge to chill the pudding too quickly; let it cool gently before adding the bananas and wafers for optimal flavor.
Storing Leftovers for Freshness
If you’re lucky enough to have leftovers, proper storage is key. Keep your Old-Fashioned Homemade Banana Pudding in an airtight container in the fridge. For best results, separately store any remaining bananas and wafers, as direct contact can cause them to become soggy. In this way, you can enjoy your delightful pudding for up to 2-3 days! For more storage tips, consider checking out FoodSafety.gov for safe practices.
Serving Suggestions for Old-Fashioned Homemade Banana Pudding
Perfect Pairings for Dessert
When it comes to serving your Old-Fashioned Homemade Banana Pudding, consider complementing it with light and refreshing options. Fresh berries like strawberries or blueberries add a pop of color and a tart contrast. Alternatively, a side of vanilla ice cream or whipped cream can elevate the dessert experience, making each bite creamier and richer.
Creative Presentation Ideas
Presenting your Old-Fashioned Homemade Banana Pudding elegantly can enhance its appeal. Layer it in clear glass jars for a stunning visual effect, showcasing those delightful banana slices and creamy layers. You can also garnish with mint leaves or a sprinkle of crushed graham crackers for that added texture. For a fun twist, try serving in waffle cones for a playful, grab-and-go dessert.
When to Serve: Occasions and Celebrations
This classic treat is perfect for all sorts of occasions. Whether it’s a backyard BBQ, birthday celebration, or holiday gathering, the nostalgic flavor of Old-Fashioned Homemade Banana Pudding is sure to delight your guests. It’s also a comforting choice for cozy family dinners or potluck parties. Whenever you choose to serve it, expect smiles and fond memories to follow!
For more delightful dessert ideas, check out Taste of Home or visit Bon Appétit.
Time Breakdown for Old-Fashioned Homemade Banana Pudding
Preparation Time
Making your Old-Fashioned Homemade Banana Pudding begins with a quick prep session. You’ll need around 20 minutes to gather your ingredients—think vanilla wafers, ripe bananas, and that creamy custard. Pro tip: setting everything out will help you work smoothly.
Cooking Time
Next up is the cooking phase, which typically takes 15-20 minutes. This is where you’ll whisk, stir, and transform simple ingredients into a heavenly pudding. Make sure to keep an eye on your pot to achieve that perfect consistency.
Chilling Time
After cooking comes the waiting game. Allow your pudding to chill in the fridge for at least 4 hours, or preferably overnight. This step is crucial for allowing the flavors to meld beautifully.
Total Time
In total, you’re looking at around 4 to 5 hours from start to finish—most of which is passive time, allowing you to tackle other tasks or just relax. This old-fashioned treat might take a bit of time, but trust me, the reward is absolutely worth it!
Nutritional Facts for Old-Fashioned Homemade Banana Pudding
Calories and Macronutrients
When making your Old-Fashioned Homemade Banana Pudding, you’ll find that each serving contains approximately 210 calories. The macronutrient breakdown typically consists of:
- Carbohydrates: 35g
- Protein: 3g
- Fats: 7g
This delightful dessert isn’t just a sweet treat; it can fit into a balanced diet when enjoyed in moderation.
Vitamins and Minerals
Bananas are packed with essential vitamins and minerals, including:
- Vitamin C: Boosts immunity
- Vitamin B6: Supports brain health
- Potassium: Helps regulate blood pressure
These nutritional benefits not only enhance the taste of your pudding but also contribute to your overall well-being. A study from the American Journal of Clinical Nutrition highlights the importance of potassium in maintaining heart health, making bananas a clever addition to this dessert (source: AJCN).
Healthier Ingredient Substitutes
Want to make your Old-Fashioned Homemade Banana Pudding even healthier? Consider these swaps:
- Whole milk: Swap for unsweetened almond milk to reduce calories.
- Sugar: Try using honey or maple syrup for a natural sweetener that offers additional nutrients.
- Vanilla extract: Choose a pure version to enhance flavor without added chemicals.
With these substitutions, you can indulge in your favorite dessert while maintaining a balanced approach to nutrition! Keeping mindful choices at the forefront of your culinary adventures can lead to both delicious and healthy outcomes.
FAQs about Old-Fashioned Homemade Banana Pudding
Can I make banana pudding a day in advance?
Absolutely! In fact, making Old-Fashioned Homemade Banana Pudding a day ahead can enhance its flavors. Allowing it to chill overnight gives the pudding time to thicken and the flavors to meld beautifully. Just cover it tightly with plastic wrap or a lid to prevent any odors from your fridge creeping in. When you’re ready to serve, give it a gentle stir and, if desired, add a few fresh banana slices on top for that eye-catching presentation.
How do I prevent bananas from browning?
Banana browning is one of the biggest concerns when preparing Old-Fashioned Homemade Banana Pudding. To keep your bananas looking their best, consider these tips:
- Citrus Juice: Lightly coat the banana slices with lemon or lime juice. The acidity from the juice slows down the oxidation process that causes browning.
- Use Fresh Bananas: Only slice bananas right before you layer them in your pudding to minimize exposure to air.
For more information on banana storage and preservation, check out this guide from the USDA.
What can I use instead of Vanilla Wafers?
If you’re looking to switch up the classic texture of Old-Fashioned Homemade Banana Pudding, there are plenty of alternatives to Vanilla Wafers:
- Gingersnaps: They add a spicy kick and a delightful crunch.
- Shortbread Cookies: If you’re after a buttery flavor, shortbread cookies are a great choice.
- Homemade Cookies: If you’re feeling adventurous, consider making your own cookies for a personalized touch.
Feel free to get creative with your choices. Your banana pudding will still be delicious, no matter the twist you put on it!
Conclusion on Old-Fashioned Homemade Banana Pudding
Recap of the Recipe’s Appeal
Old-Fashioned Homemade Banana Pudding is more than just a dessert; it’s a nostalgic experience that brings comfort and satisfaction. With its creamy layers of custard, fresh bananas, and crunchy vanilla wafers, this recipe strikes a perfect balance of flavors and textures. It’s a delightful treat that’s perfect for family gatherings or a cozy night in.
Encouragement to Try Homemade Versions
If you’ve never ventured into making your own desserts, now is the time to start! Crafting your own banana pudding might seem daunting, but it’s surprisingly straightforward and allows you to customize the flavors to your liking.
Invitation for Sharing Experiences and Variations
I’d love to hear about your adventures in making Old-Fashioned Homemade Banana Pudding! Did you add a twist with ingredients or toppings? Share your thoughts and variations in the comments below or on social media. Your creative adaptations might inspire others to discover their own banana pudding masterpiece!
PrintOld-Fashioned Homemade Banana Pudding: A Truly Irresistible Delight
Indulge in the creamy, dreamy goodness of this Old-Fashioned Homemade Banana Pudding, a timeless dessert that never fails to please.
- Prep Time: 20 minutes
- Cook Time: 15 minutes
- Total Time: 4 hours 35 minutes
- Yield: 8 servings
- Category: Dessert
- Method: No-Bake
- Cuisine: American
- Diet: Vegetarian
Ingredients
- 2 cups whole milk
- 1 cup heavy cream
- 3/4 cup granulated sugar
- 1/4 cup cornstarch
- 1/4 teaspoon salt
- 4 large egg yolks
- 1 teaspoon vanilla extract
- 4 ripe bananas
- 1 box vanilla wafers
Instructions
- In a medium saucepan, whisk together milk, cream, sugar, cornstarch, and salt over medium heat.
- Cook while whisking until thickened, about 10 minutes.
- In a bowl, whisk egg yolks, then temper with the hot mixture.
- Return everything to the saucepan and stir in vanilla.
- Let cool slightly before layering with bananas and vanilla wafers in a dish.
- Chill in the refrigerator for at least 4 hours before serving.
Notes
- For the best flavor, use ripe bananas.
- Banana pudding tastes even better the next day, once the flavors meld.
Nutrition
- Serving Size: 1 serving
- Calories: 350
- Sugar: 25g
- Sodium: 150mg
- Fat: 20g
- Saturated Fat: 12g
- Unsaturated Fat: 6g
- Trans Fat: 0g
- Carbohydrates: 45g
- Fiber: 2g
- Protein: 5g
- Cholesterol: 150mg